Introduction#
There are many common ways to use a camera on a high altitude balloon flight and probably just as many novel ways to use a camera on a flight as well. The most obvious use is to take images or video out of the side of the payload throughout the flight to get nice views of the entire mission as if you were a passenger on the balloon, maybe even watching airplanes fly by. Some missions have a dedicated camera pointing straight up at the balloon to capture spectacular images of the latex shredding to pieces as it pops. Other missions use a collection of synced photo or video cameras to take panoramic or full 360-degree views. Keeping your camera warm, dry, and happy is an area of debate and subjectivity, but the following sections address a few key factors that will contribute to the outcome of your effort to record images.
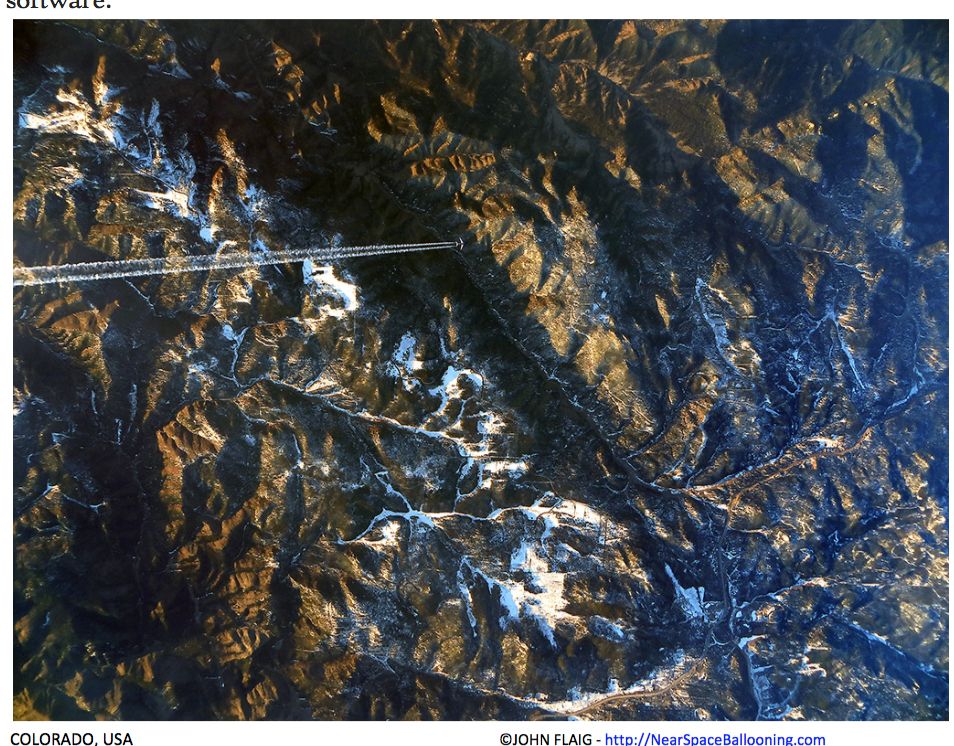
Looking down on a commercial airliner over the Rocky Mountains. Photos from the Global Space Balloon Challenge gallery and NearSpaceBallooning.com.
Environment#
Adding an airtight case to your camera is a great way to give your expensive device extra protection from the elements but it also introduces another potential container for condensation to form within, collect on one of the optical surfaces, and ruin your footage. If you do use a case it would be prudent to use a desiccant like silica gel to remove extra moisture from the air trapped inside. There is also some precedent for not using a case at all, but this is a judgment call you are going to have to make for yourself.
A common and popular approach is to make a hole just large enough to snugly fit the camera or camera lens so that it stays inside the box but fills the hole enough to prevent it from being a wide-open vent into near space. This gives you the best of both worlds: thermal protection from the insulated payload box without a separate case that traps moisture.
Because the air will get so cold on your way to the stratosphere, you will want to think hard about heating your camera to keep it above its minimum operating temperature. User manuals or other technical data sheets should have this information, but it would be a great idea to test this because the stratosphere is an extreme environment that your camera was not specifically designed for. You might even find that your camera is more resilient than advertised and you can get away with not heating it at all. See the Testing chapter for more on this.
Heating Methods#
Some payloads have been designed to use chemical hand warmers to keep the camera, batteries, and other electronic parts warm during a flight. I am skeptical that this type of warmer will work well at high altitude because they utilize a slow, exothermic reaction with oxygen, which is in very short supply at the altitudes we are going to, not to mention that their heat output seems very low for the extremely cold temperatures encountered, around -50 degrees C (-60 degrees F).
I also don’t believe that the supersaturated hand warmers (utilizing the heat of crystallization of a solution) will work very well because all of the heat is generated within a few seconds and the benefit of using them is just from the slow transfer of heat from the relatively tiny crystalline “reservoir” to your hands.
If you are going to use heating, I strongly recommend that you at least use heater blocks with a passive connection to batteries. More than that, I think the best way to do this is to have an Arduino-controlled (or similar) thermostat that measures the temperature at key locations and can cycle heaters as needed to keep a minimum temperature. This is much more complicated than the other passive methods I mentioned, but it also seems to be the only real, good way to do this. I will either accept the risk (or prove by testing) of going without a heater or I will go through the trouble of making a thermostat system for my payload.
A final complication to throw into this mix is that electronics function much better in the cold than batteries do, so it’s a little bit strange to use a weak system to bolster a strong system that might not even need the help as long as it still has a supply of electricity.
It appears that GoPros generate a lot of heat on their own and have been known to operate for a long time even outside of any enclosure without supplemental heat or insulation. If you are flying a GoPro, this is worth testing before you add heating complexity you may not need.
Logistics#
There are many things to consider when selecting a camera and when installing it in your payload. There are many cameras that can work for high altitude ballooning, and far too many to even start reviewing here. Even suggesting a small set of best solutions would be a large body of work and then camera technology always advances quickly so the data generated would quickly become stale.
The HAB Photography How-To guide has a large amount of useful information to consult if you are going to be placing a camera in your payload. The reader is directed to that guide for the most extensive information, but an overview and some of the most relevant details are discussed here.
Perfecting the composition within the frame might seem like an intermediate concern, but if you are going to be taking images and taking a certain amount of risk with some expensive hardware then it should be worth it to you to make a concerted effort to get good images. Some tips are to point your camera 10 to 30 degrees downward to get more frames that are 2/3 Earth and 1/3 sky, fitting nicely into the well-known rule of thirds for photography. If you want to get even more specific with your alignment, you can get a KML (Keyhole Markup Language) file from a flight prediction program, load it into Google Earth, and consider what camera setup (and launch site) could work best for your intended target. This can even help you pick the right kind of camera and camera lens if your camera allows that. Making sure your payload is balanced is also important so that not all of the photos come out crooked!
Foam, Velcro, and duct tape can all be your friends when securing your camera and other elements of your payload. With the added complexity of more securement pieces comes greater security for your camera but also more possible points of failure if, for example, anything were to come loose. Any switches that should not move during the mission could be taped in place to ensure that they stay where they should be. If you are applying heat to the camera, make efforts to avoid applying heat to the LCD screen but do try to apply heat to the area of the battery. Payload windows may seem like a great way to protect the camera even more, but this is likely to turn into a condensation collection point or glare-producing surface that will degrade your photos during parts of the mission.
Consider launching so that your balloon is breaking through cloud level around the golden hour of the morning, when lighting is much better for landscape photography because of the shadows and softer light. You can use a golden hour calculator to plan your launch timing. This would also work in the evening but then it guarantees an uncomfortable night search or a wait until morning. Even a cloudy day on the ground can be an excellent opportunity for great photos above the clouds, although this does bring up airspace regulations, discussed later.
Camera Selection#
I suggest you at least consider a trade study, where each camera that might fulfill your need is scored on the same set of criteria, and if you set it up correctly, the one with the highest overall score is your best choice. Some common values to consider include weight, battery life, interval mode support, RAW file support, sensor size, lens interchangeability, external triggering/syncing, and external power. Digital SLR cameras are big, heavy, and expensive, which are all bad for high altitude ballooning, but they would take the best images if it is worth all of the other downsides to you. Unless you have some super-specific and important reason to use an SLR, I am going to say that they are far too heavy to launch with almost any mission. Point-and-shoot cameras have become more impressive all the time and would likely fulfill almost any reasonable desire to capture images from the stratosphere.
Some options that you may be able to control to improve battery life are: LCD screen to dim or off, face detection off, red eye reduction off, autofocus assist off (set focus to infinity), GPS tagging off (however, geotagging photos might be worth the battery power), and sounds off. I also like to set a specific white balance that is selected to be most appropriate for the most photos or video. This setup gives a more consistent result, and if you have to do blanket post-processing, it will streamline the process. You may also consider setting exposure, aperture, and ISO, but you might also run the risk of making a mistake while adjusting the setting or having an unexpected environmental condition that might have been handled better by the auto-exposure routine. JPG images are very common, but RAW images will give you lossless files at the cost of taking up much more space on a memory card.
Video as the Simple Option#
For rugged and reliable operations, you cannot do any better than an action camera. GoPro, Sony, and Garmin are popular manufacturers of action cameras but there are quite a few other options as well.
If you don’t have an action camera, and don’t feel like shelling out the money for one, then I would recommend using just about anything that you can get your hands on that will take video. Taking video is best in most cases because you can “set it and forget it,” whereas for images you need to press the button (if you don’t have some appropriate routine, either built-in or custom) and that is difficult while you are on the ground and your balloon is ascending into the stratosphere.
If you want to get a new camera, like a point-and-shoot, then Canon and Sony are good options for two unique reasons. Canon has something called CHDK (Canon Hack Development Kit) that lets you customize operation of the camera for use as, say, an intervalometer, also known as a time lapse camera. On the other hand, there are dummy batteries available for some Sony cameras that let you use the camera as usual, but using an external power source, which can be very helpful with high altitude ballooning.
CHDK for Complete Camera Control#
There are other camera modification methods out there, but CHDK for Canon is by far the most popular and accessible method. The best resources for learning to implement CHDK are the CHDK Wiki and the CHDK Autobuild directory.
The SparkFun HAB tutorial section on cameras gives some very useful information about CHDK. For example, CHDK can be used for many applications including motion detection that can even photograph lightning. There are also some links for getting a good version of the code that runs an appropriate intervalometer on your Canon camera.
If you’re going for the silver medal I highly recommend using CHDK on a Canon camera, as has been done numerous times by many people on many missions. For the gold medal you will need to go about building your own camera. I don’t know how the image quality will be but the bragging rights are unbeatable. Your friends will ask, “What did you do this week?” And you will say, “I built a camera and then I sent it to space.” Boom. Win.
Raspberry Pi Camera#
You could purchase a Pi Camera to attach to a Raspberry Pi and put it in a nice case. For power it is possible to use a wall plug at home, but you’ll want to arrange something else for flight. Adafruit also recommends this battery pack and includes some technical details there if you plan on using something else but want to make sure you are going about it the right way. The Pi Camera is a fun option if you are (or would like to be) familiar with the Raspberry Pi ecosystem.
The Next Level#
If simply taking photos or videos is not challenging or interesting enough for you, you can do 360-degree captures, stereo vision, or panoramic images. The Global Space Balloon Challenge offers that “advanced balloonists may want to consider 360-degree cameras, stereo vision 3D cameras, or multiple panorama view cameras.” You can also take inspiration from UCSD, where they triggered six Canon cameras simultaneously with an Arduino.
Are you crazy? Why don’t you design a gimbaled camera system to point at exactly what you want? You’ll probably get an award and 1000 high-fives if you do it.
Balloon Photography Examples#
Besides the photo near the top of the page I would also recommend you check the webpage of Patrick Cullis. Great stuff!